Floor plan viewer
Toolbar
In the toolbar, you can select which data is shown in the floor plan and which tool is active. Your choices are remembered if you open another floor plan.
| Layers | Select which layers are shown in the floor plan. You can select multiple layers. |
| Space coloring | Select the coloring used in the floor plan for spaces. |
| Capacity object coloring | Select the coloring used in the floor plan for capacity objects. |
| Labels | Select which labels are shown in the floor plan. You can select multiple labels. Labels are shown in the order they were selected. |
| Sums | Select the type of summary data shown in the floor plan viewer. This affects e.g. the space legend and the footer. |
| Date | Select floor plan date. You can also select a different floor plan revision from this menu. |
| Pan | Move the floor plan. |
| Select | Select spaces/objects in the floor plan. |
| Tools | Other tools that can be used to modify floor plan view, e.g. floor plan rotate and add annotations. | |
| Edit | Options for editing or creating data in the new floor plan viewer. |
| Browse space data | View space data for the selected spaces. |
| Menu | Additional features of the floor plan viewer. |
| Open legacy floor plan viewer | Note: Only visible in the Internet Explorer browser. Opens the current floor plan in the legacy floor plan viewer. |
| Floor plan order | Opens the floor plan order form for this building and floor. |
| Print floor plan | Opens print preview. |
| Settings | Opens floor plan viewers settings. |
Panels
On the top of the floor plan you will see panels that show data and editing functions. It is possible to move the panels by dragging them from the top. Size of the panel can be changed by dragging from the lower right corner. You can restore the panel to its original size by double clicking it. The panel also returns to its original size after a page reload.
Space legend
The space legend is shown whenever any space coloring is selected.
| Collapse | Collapses the panel. |
| Expand | Expands the panel. |
| Clear selection | Clears all space selections (only visible if any spaces are selected). | |
| Legend | Shows summary space data grouped according to the selected coloring. Legend rows can be sorted by clicking on the corresponding heading. You can show coloring only for specific spaces by clicking on their row(s) in the legend. | |
| Select colored spaces | Selects all spaces that are colored. | |
| Reset coloring | You can reset row selection by clicking here. You can also deselect a single row by clicking on the row again. | |
| Show details | In the Outrent rental areas coloring, you can select if more detailed information is shown in the legend, e.g. the agreement's tenant and term of validity. |
Changing data color
You can change the color shown for specific data. Click the color box in the legend, then either select a new color with the color picker or enter the hex code of the new color. Update the color by clicking Save.
The new color is used for the selected data in all floor plans. You can reset to the original color by clicking the color box and selecting Reset to original color. Color settings are user-specific.
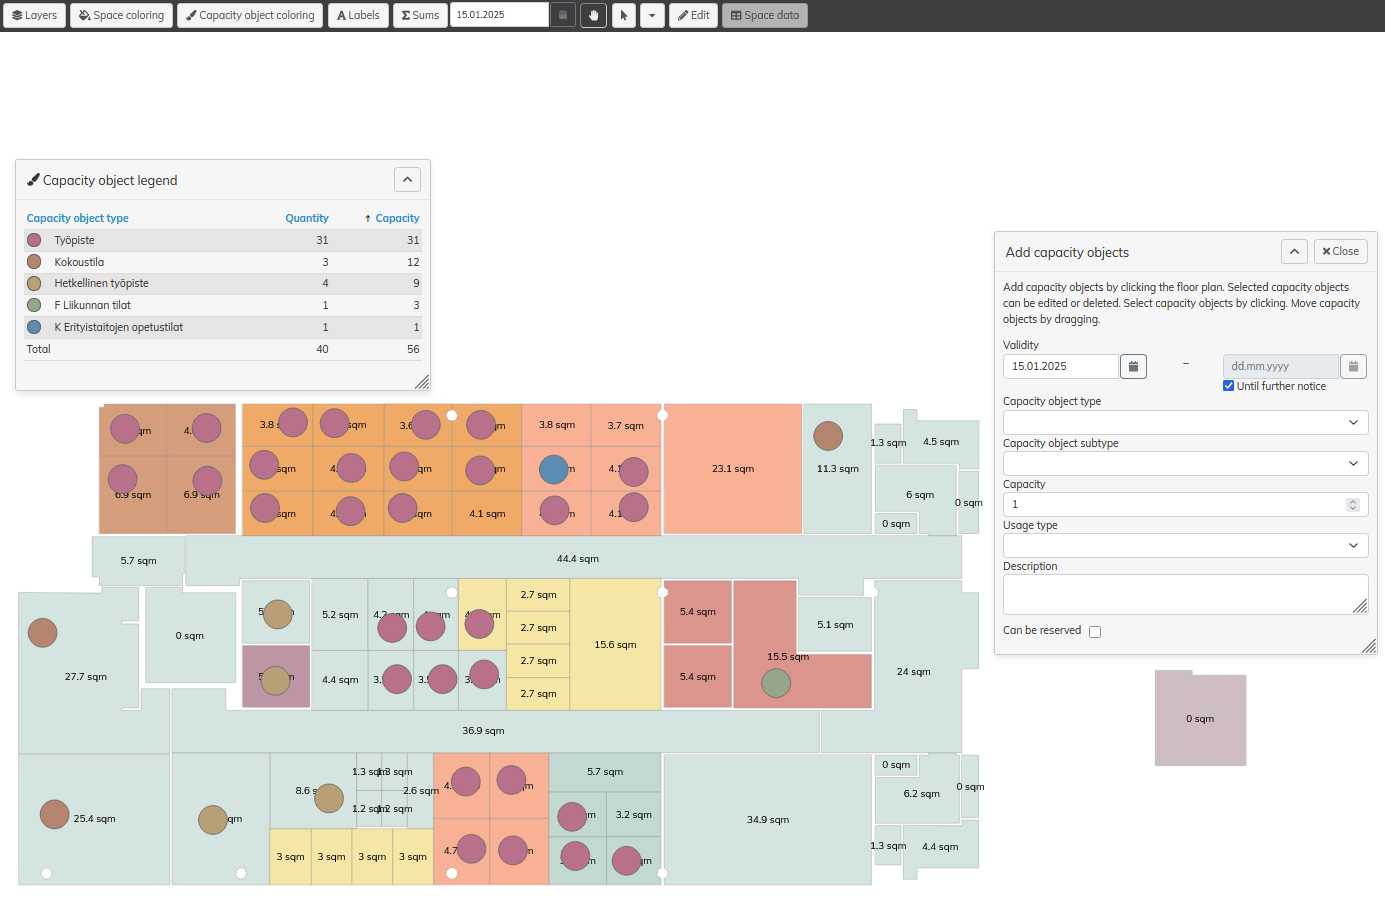
Capacity object legend
The capacity object legend is shown whenever the capacity object layer is visible and any capacity object coloring is selected. The capacity object legend works similarly to the space legend, but does not have all of its features.
Footer
The footer shows floor plan basic information: the name of the building and the floor, the selected revision, and the selected summary data. You can select a different floor of the same building by clicking the floor name in the footer.
Floor plan
Moving the floor plan
To move the floor plan, select the Pan tool and drag the floor plan with the mouse. You can also use the arrow keys on your keyboard.
When using the Select tool, you can temporarily switch to the Pan tool: press and hold the space bar on your keyboard.
Floor plan zoom level can be changed by using the mouse wheel or the zoom buttons in the floor plan viewer.
Floor plan can be rotated with the rotatetool found in the tools-menu. Rotating is done clockwise with degree accuracy (0-359 degree). Refreshing the browser view reset the floor plan to the default angle (0).
Selecting spaces
You can select spaces in the floor plan when the Select tool is active. Click on a space to select one space at a time, or click and drag to select all spaces in a larger area. Selected spaces are highlighted with red.
Space coloring and labels
By default space coloring and labels are shown in all spaces. You can change these settings by selecting Menu > Settings. There are own settings for space coloring and labels. Settings are saved to browser cache, so that the selected options are remembered when you change the floor.
Options:
- In all spaces
- Coloring/labels are always shown in all spaces, regadless the space selection.
- In selected spaces after the change
- By default coloring/labels are shown in all spaces, but if any spaces are selected when the coloring/labels is changed only the selected spaces are colored/labeled. Space legend only shows data from the colored spaces.
- Only in selected spaces
- Coloring/labels are only shown in selected spaces. If there is no spaces selected, coloring/labels are show in all spaces.
Shortcuts
| 1 | Select Pan tool |
| 2 | Select Select tool |
| Space | Temporarily select Pan tool |
| Ctrl + A | Select all spaces/objects |
| Ctrl + D | Deselect selected spaces/objects |
| Ctrl + F | Open floor plan search |
| Esc | Close open editor and deselect selected spaces/objects |
| + | Increase font size of labels |
| - | Decrease font size of labels |
| 0 | Reset label font size to original size |
| I | Zoom in |
| O | Zoom out |
| U | Reset zoom level to original state |
| Mousewheel | Zoom in & out |
| Arrow keys | Move floor plan up, down, left & right |
| S | Toggle visibility of Spaces layer |
| F | Toggle visibility of Furniture layer |
| T | Toggle visibility of Capacity objects layer |
Browse space data
You can browse space data for the selected spaces by selecting Browse space data from the toolbar. By default only the valid space data is shown. By removing selection from Show only valid data checkbox, also the beginning and ended space data will be shown. You can also filter the data by selecting a space data type. By default data from all space data types is shown.
Some space data types can be edited and/or deleted. These types are configured customer-specifically. Space data can be exported to Excel by selecting Export data to Excel. The data shown on the user interface will be exported to the Excel.
Edit
The options available in the Edit menu are determined by user permissions and and customer settings. Customer-specific configurations may be used with most data; due to this, the details may differ from what is described here.
Space data
You can edit various data linked to spaces, e.g. space categories and organizations, when you have selected one or more spaces.
- Select the space or spaces you wish to edit in the floor plan.
- Select Edit > Space data... in the toolbar.
- Select the type of data you wish to edit (e.g. space category).
- Enter or select the new value.
- Enter or select associated data (e.g. begin and end date).
- Save.
Rental areas and car parks
Rental areas and car parks are defined in Optimaze as groups of spaces which can be rented. Creating and editing rental areas and car parks is only available for property management customers.
Creating a rental area or car park
- Select Edit > Rental areas... or Car parks....
- Select spaces for the rental area or car park in the floor plan.
- Enter details for the rental area or car park (name, lessor etc.)
- Save.
Editing a rental area or car park
A rental area or car park can only be edited or deleted if it is not used in a valid agreement.
- Select Edit > Rental areas... or Car parks....
- Select the Edit tab.
- Select the rental area or car park. Spaces linked to the rental area or car park will be selected automatically.
- Edit or delete the rental area or car park. (You can add or remove spaces by clicking in the floor plan.)
- Save.
Objects
It is possible to place object to the floor plan. E.g. rescue plan or freehand space texts. Object types can be text or symbols. Object types can also be space dependent. If object type is space dependent, objects can only be placed inside spaces.
Placing symbol object
- Select wanted object type from Edit dropdown.
- Edit additional options if needed (options are object type dependent)
- Begin and end dates
- Scale
- Angle
- Select the object from the list.
- Click the floor plan from the coordinates where the object should be placed.
Placing text object
- Select wanted object type from Edit dropdown.
- Write the wanted text to 'Value' input
- Edit additional options if needed (options are object type dependent)
- Begin and end dates
- Scale
- Angle
- Color
- Frame labels
- Click the floor plan from the coordinates where the object should be placed.
Removing object from spaces
- Select wanted object type from Edit dropdown.
- Click to select the object in the floor plan.
- Select Remove and confirm the removal.
Objects position can be changed by dragging it in the floor plan viewer. If you drag a space dependent object outside the floor plan, it will be removed.
People
Placing people in spaces
- Select Edit > People....
- Edit begin and end dates, if needed.
- Select the person from the list.
- Select the space where the person should be placed in the floor plan.
- Confirm the placement. You may be prompted to specify how existing person placements should be changed, if applicable.
Removing people from spaces
- Select Edit > People....
- Click to select the person in the floor plan.
- Select Remove and confirm the removal.
You can also change person placements by moving the person's name in the floor plan. Click and drag from one space to another to move a person, or outside the floor plan to remove a person.
Annotations
Annotations can be added to the floor plan. Annotations will not be saved, they will be removed when the browser is refreshed. Annotations are user-specific.
Annotations are shown in 'Annotations'-layer. Annotations are shown in the floor plan print.
Adding annotations
- Select Tools-menu > Add annotations....
- Select annotation type (text, line, area).
- Select additional options (depends on the selected type)
- Add the annotation by clicking in the floor plan
- To add line or area, click in the floor plan more than once.
- To finish the drawing of line or area, click the last point again or click the 'Finish line'/'Finish area' button from the editor panel.
- Repeat until you have added all annotations.
- Select 'Done'
Show distance
For the line annotation type it is possible to measure distance. Distance is measured between added points and also for the whole line. Distance is part of the annotation objects and it is shown in the floor plan print.
Show area
For the area annotation type it is possible to measure distance and/or area. Distance is measured between added points and area is measured for the area delimited by the added points. Distance and area info are part of the annotation objects and they are shown in the floor plan print.
Note. If the lines in the drawn area intersect, area is not shown.
Editing annotations
- Select Tools-menu > Add annotations....
- Click to select the annotation in the floor plan.
- Selected annotations are shown in the editor panel.
- Selected annotations can be removed by clicking the 'Remove'
- Selected annotations can be moved by dragging.
- The shape of line and area can be modified by dragging the corner points. Corner point can be deleted by clicking it.
Capacity objects
Capacity objects placed in the floor plan can be used e.g. in space utilization measurements. You can toggle capacity object visibility in the Layers menu.
Adding capacity objects
- Select Edit > Capacity objects....
- Define validity of capacity object. By default new capacity objects are valid for now, starting from the date selected in the floor plan viewer.
- Select type and subtype, if applicable.
- Select capacity. Default capacity for new capacity object is one.
- Select usage type, if applicable.
- Select "Can be reserved" if the capacity object is used for booking purpose in Worksense
- You can add an email address to reserved capacity object for room integration purpose
- More detailed information in Worksense guide
- Add the capacity object by clicking in the floor plan.
- Repeat until you have added all capacity objects, editing capacity object details as necessary.
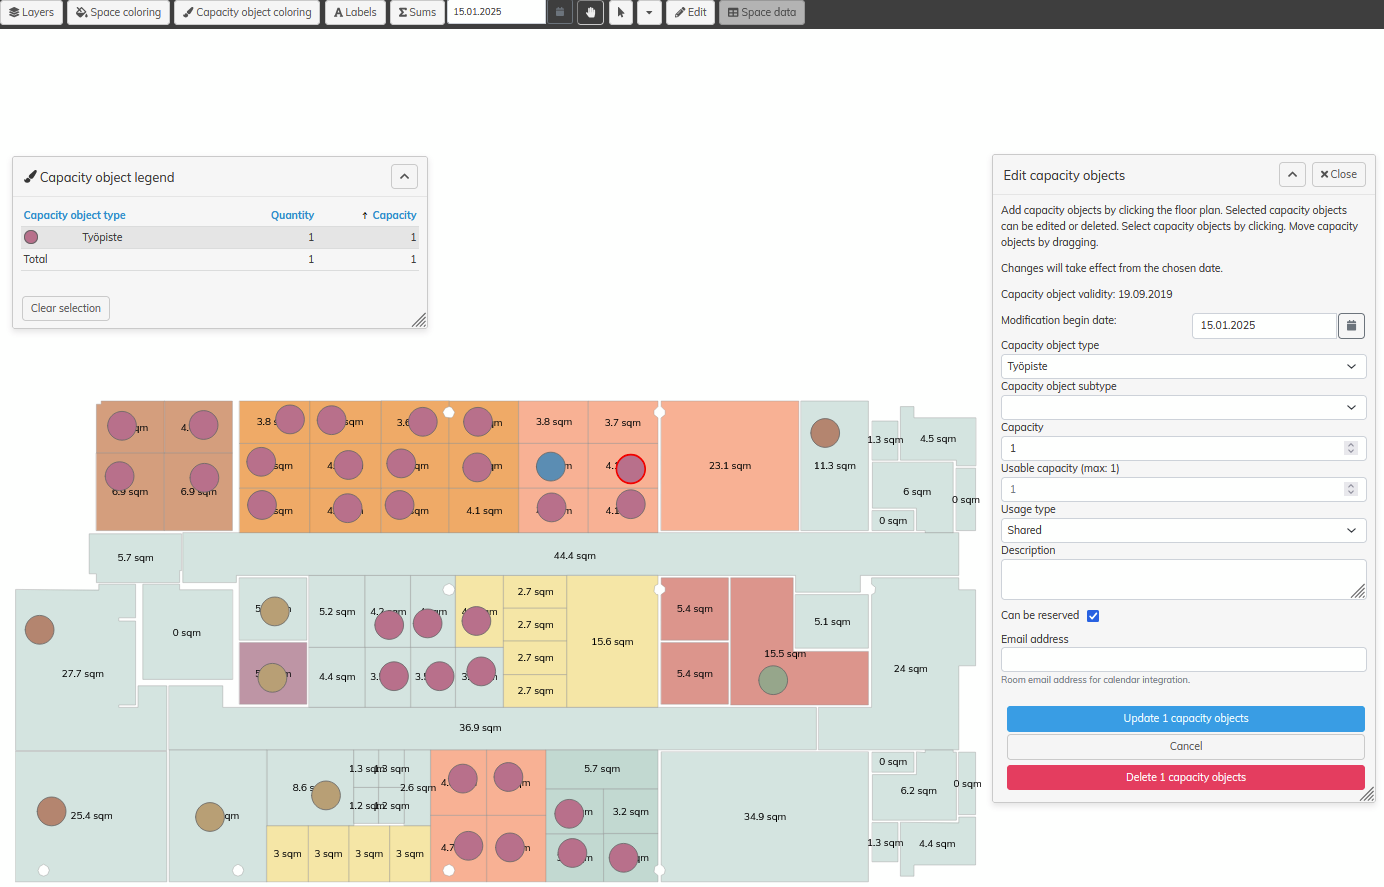
Editing capacity objects (Single capacity object)
- Select Edit > Capacity objects....
- Click to select the capacity object in the floor plan.
- Select the Modification begin date. From this date the modified details are valid
- Edit details for the capacity object or objects:
- Capacity object type
- Capacity object subtype
- Capacity
- Usable capacity
- Usage type
- Description
- Can be reserved
- Email address
- Changes are saved based on the values selected in the fields when update button is pressed
- Alternatively, you can delete the selected capacity objects by selecting Delete selected capacity objects
- When deleting the capacity objects, you must select do you want to delete all the capacity objects data, or just end the capacity object starting from selected date.
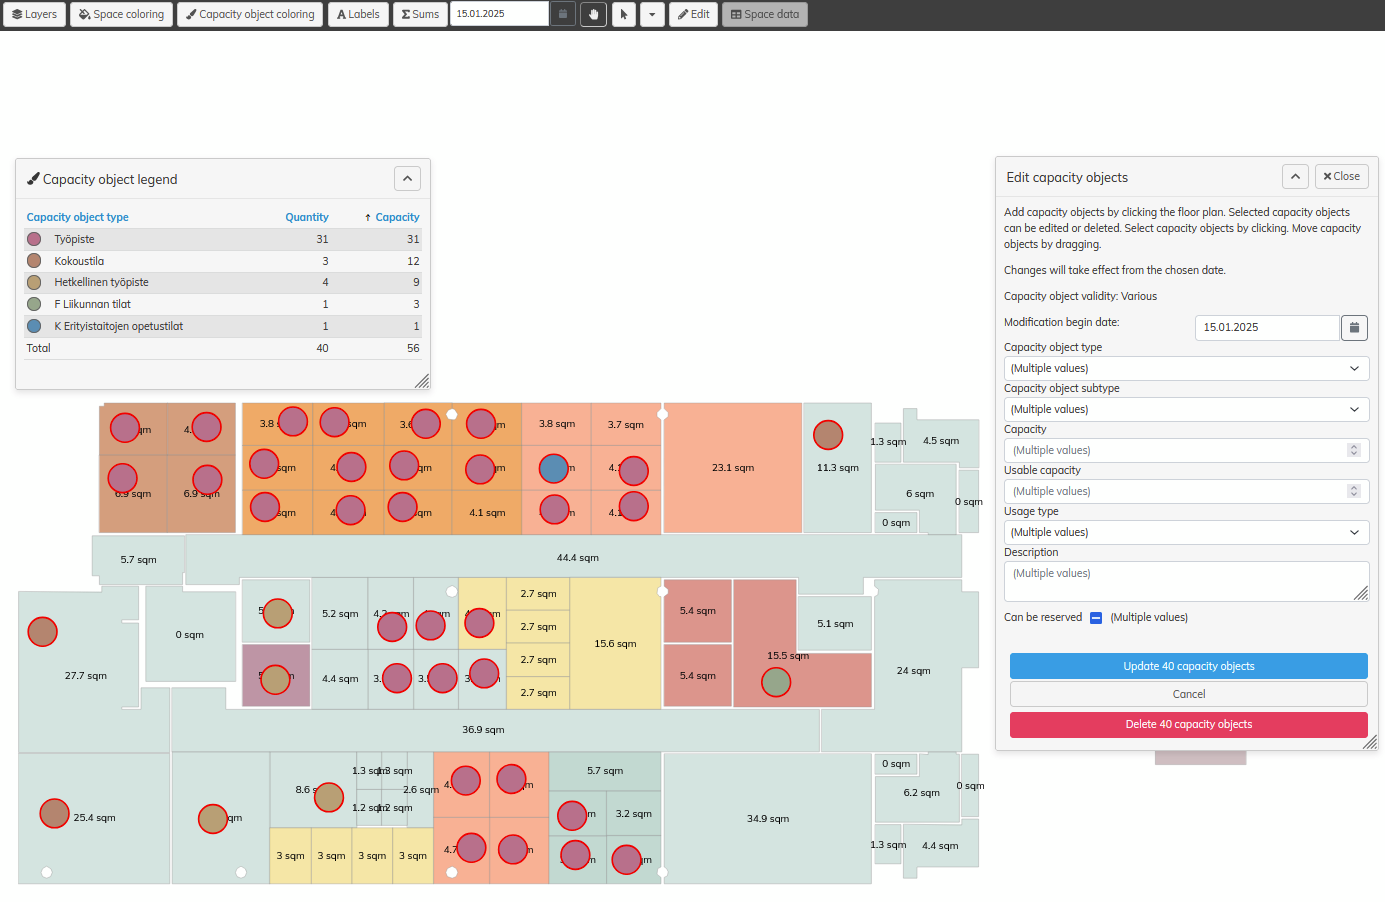
Editing capacity objects (Multiple capacity objects)
- Select Edit > Capacity objects....
- Click to select the capacity object in the floor plan. Click on a capacity object to select one capacity object at a time, or select 'Select' tool and drag to select all capacity objects in a larger area.
- Select the Modification begin date. From this date the modified details are valid
- Edit details for the capacity object or objects:
- Capacity object type
- Capacity object subtype
- Capacity
- Usable capacity
- Usage type
- Description
- Can be reserved
- Every field will show "(Multiple values)" if the selected capacity objects contain different values
- When saving field values, that have multiple values, no values are saved on any selected capacity object
- "(Multiple values)" selection can be replaced with other value per field, and after that ALL selected capacity objects are saved with that value, when update is pressed
- Email address field can't be updated when multiple capacity objects are selected
- Alternatively, you can delete the selected capacity objects by selecting Delete selected capacity objects
- When deleting the capacity objects, you must select do you want to delete all the capacity objects data, or just end the capacity object starting from selected date.
To move a capacity object, drag the object in the floor plan. You can only move one capacity object at a time.
If the editable capacity object has saved changes in the future, a message will appear where you can choose whether you want to overwrite all data in the future or do you want to create a fixed period change that ends at the beginning of the next saved change.
Create measurement
You can create Active measurement from the capacity objects placed to floor plan. Measurement is created from selected capacity objects. By default all placed capacity objects are selected.
Floor plan order
Floor plan orders can be used to order a change to an existing floor plan or to order floor plans for an entirely new floor.
Creating a new order
To create a new order select New floor plan order... and fill in the necessary details on the form. To order a change to an already existing floor plan start typing the name or the code of the building and select the correct building from the listing. The address details, if existing, will automatically be filled in. If the building does not yet exist, simply type in the wanted name and address for the building. Enter the name for the floor in question.
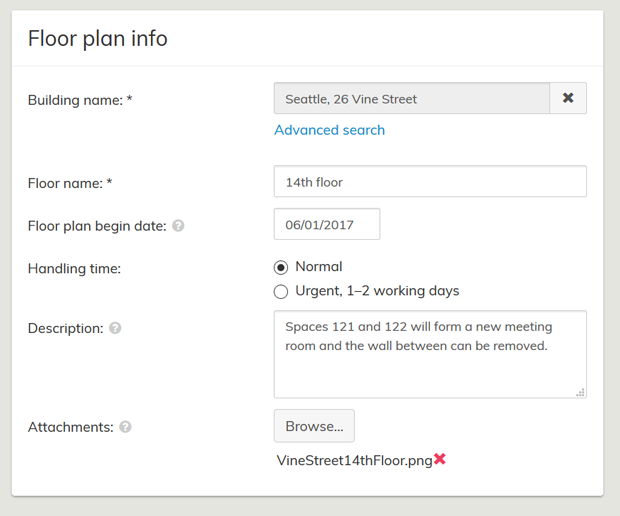
Figure 1. The necessary details filled out.
If an existing building cannot be found, you can use the Advanced search. Besides the building name and code, all levels of the building hierarchy can be used to find the correct building. You can simultaneously use several search terms to search, for example a level in the building hierarchy and building name. Select the wanted building by clicking on the name and the details of that building will be transferred to the form.
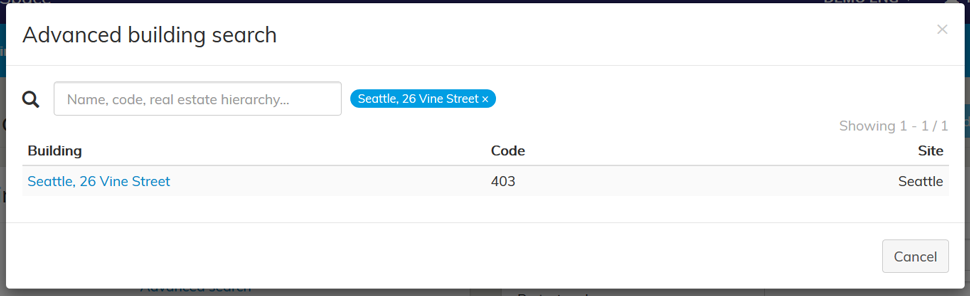
Figure 2. Advanced search
The selected Floor plan begin date determines what date onwards will the drawing be active.
The Description and Attachments should describe what the new floor plan will entail. Mark or describe clearly which spaces are new or being changed and what space category (office, corridor, storage, etc) do they belong to. Also add labels for the spaces, if known, and clearly mark elevators, technical service spaces, service shafts and high ceiling spaces. Also mark clearly any structures that need to be removed. The attached files should be less than 25 Mb.
NOTE! If the attachments aren’t in DWG format, dimensions need to be added to the pictures.
Additional information, like the possible Project name and code, can be added on the Basic info–card. Additional emails are any email addresses you want the order process updates to be sent to besides your own.
Once you have added all the necessary details select Send.
Viewing orders
Sent orders are shown on the Floor plan orders list. Here you can see whether the order has been Sent, is In Progress or Completed. The details of each order can be viewed by clicking on the Id.

Figure 3. Ordered floor plans list