How to:
How to activate cloud API for Nets terminals
Solutions applied to
Where do you have to make changes:
- Hallinta
- Payment terminal
Step-by-step guide
Step 1: How to add cloud API to a payment terminal from Nets
Step 1.1: Firstly, you have to send a email to Nets ( different emails depending on country, see below) with the following information —> Terminal ID, Business ID, Name of the company and ask that they can connect the terminal to @timma_cloud connection.
Email adress:
Finland → tuki-fi@nets.eu
Sweden → support-se@nets.eu
Norway →
Step 1.2: Wait until Nets replies to you!
Step 1.3: When Nets replies to you they should have sent something looking similar to this:
The terminal ID 40196552 has been added to the connect@cloud user account below.
{'username': 'timma_timma_shared', 'password': 'wbKmj8x617(81mPs'}
Now you can continue with step 2.
Step 2: How to connect cloud API to Hallinta
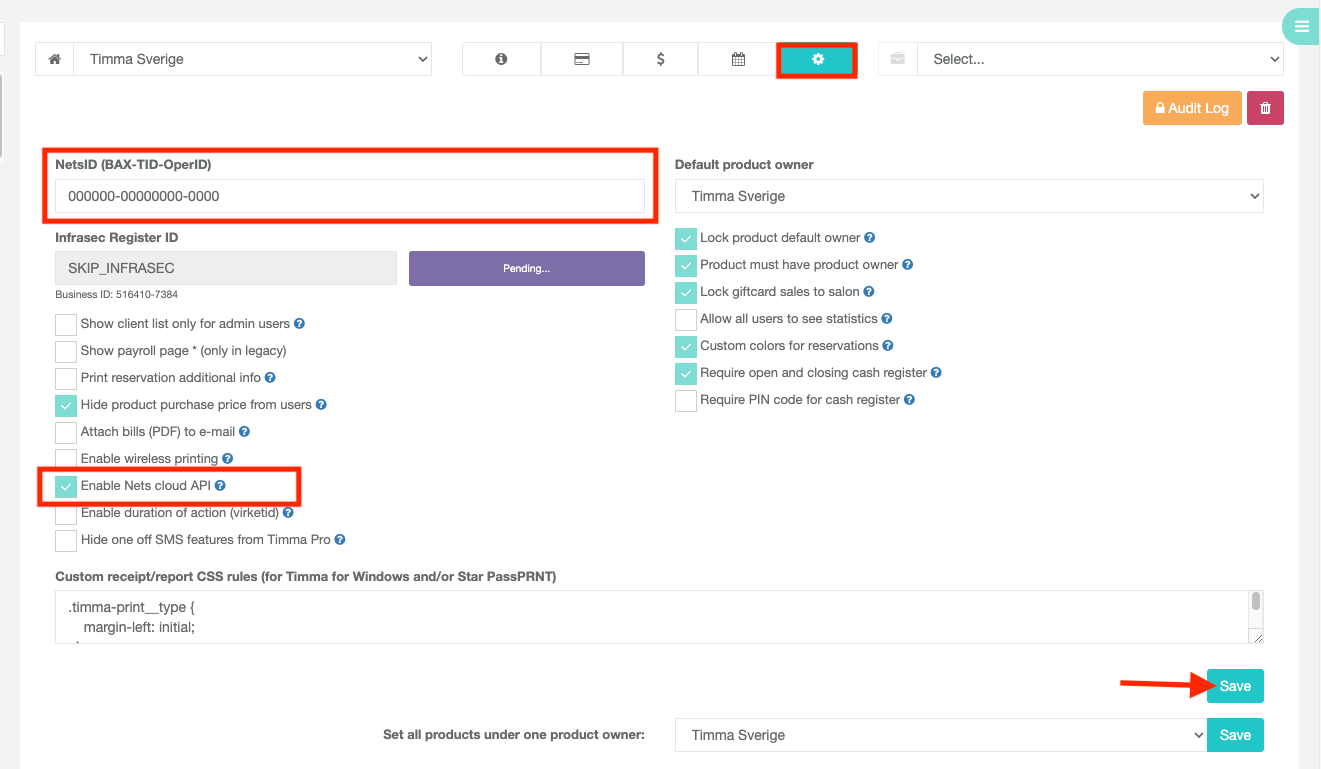
Step 2.1: Firstly, you have to search for the right customer and click on the gear icon.
Step 2.2: Make sure that the Bax, Nets ID and the order of the terminal is correct ( see screen shot below). If you do not have this information read following case ….
Step 2.3: If the Bax and Nets ID is correct, you have to mark the option “ Enable Nets cloud API”
Step 2.4: Click on “Save”
Now you can continue with step 3.
Step 3. Test the connection ( would recommend doing this together with the client)
Step 3.1: Log into the account with “force admin” and go to “More” and “Payment terminal”
Step 3.2: Now you can double check the information. It should look like this:
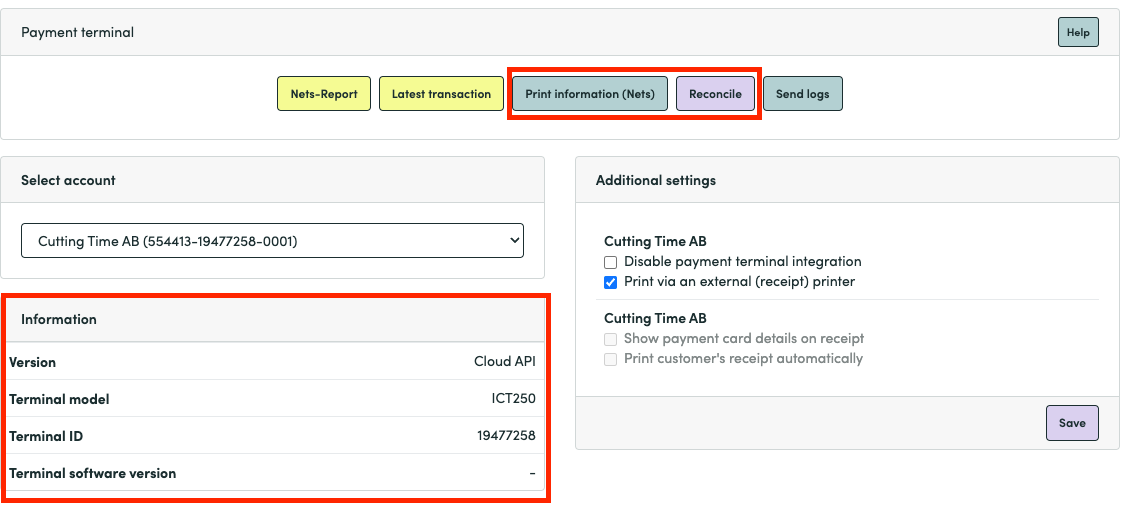
Step 3.3: Click on the button “ Print information” and wait a few moments. If you get an error, wait a while ( 10-20 minutes and try again) because sometime it can take a few moments for the cloud API to become activated. If the “Print information” is successful continue with the next step. If it fails once again after waiting a while, please check the Troubleshooting below.
Step 3.4: Now you can try to make a reconcile. If successful please continue with step 3.5. If you get an error, see what the error message says to see if you get any information. Otherwise, go to the Troubleshooting below.
Step 3.5: To make sure everything works as it should, ask the client to open Timma Pro in their browser and go to the cashier. In the cashier they can take any service and edit the price to 1 or 10 kr / Nok / Euro
Step 3.6: Confirm the payment. If the payment goes through the everything works! If the payment fails, double check the error message or you can check the Troubleshooting below.
Step 3.7: Inform the client that they can make a refund of the payment if they want to.
Troubleshooting:
If you have trouble activating the cloud API see the information below.
If you get an error whilst testing to “Print information” under “ More —> Payment terminal” you have to check the internet setting in the payment terminal.
- If the salon has Wifi do the following steps:
Use the merchant card and press 6-1-2 and choose «WIFI»
Press red button a couple of times until the terminal says use card.
Without using the merchant card first, follow the instructions below.
Press Arrow down -> Choose WIFI settings -> Merchant card -> Scan network -> Find and choose correct network -> insert password -> Green button.
If they put in the wrong password: Press Arrow down -> Choose WIFI settings -> Merchant card -> Advanced options -> my profile -> Delete all.
Repeat: Press Arrow down -> Choose WIFI settings -> Merchant card -> Scan network -> Find and choose correct network -> insert password -> Green button.
- Check settings in the payment terminal —>
Use the merchant card and press 6-1-3
Ecr: Yes
Comm Type: IP Wifi
ECR IP-adress: 212.226.157.243
ECR/TLS: Yes
ECR IP PORT: 6001
After checking this, ask the client to click on the red button a few times so that the terminal can restart. When terminal has restarted please try to “print information” again.
If the salon has internet via router ( Ethernet)
- Make sure that the payment terminal is connected to the router and go through the following settings by swiping the merchant card through the payment terminal.
6 Parameters ( settings) -> 1 Other -> 2 Connections: Ethernet
6 Parameters (Settings)-> 1 Other -> 3 Cashier: Yes
6 Parameters (settings) -> 1 Other -> 3 Cashier -> Comm. Type: IP Ethernet
6 Parameters (settings) -> 1 Other -> 3 Cashier -> ECR IP-address: 212.226.157.243
6 Parameters ( settings) -> 1 Other -> 3 Cashier -> ECR/TSL: Yes
6 Parameters (settings) -> 1 Other -> 3 Cashier -> ECR IP PORT: 6001
After checking this ask the client to click on the red button a few times and wait until the terminal has reloaded. When terminal has restarted please try to “print information” again.
- If you can not do a reconile please check the error message, some times they give valuable information.
- If the information above is correct and you can not do a reconile and you have waited for 15-20 min please create a issue in dev_support in slack.
- If the dev_support can not help you have to contact Nets.